Wednesday, April 18, 2012

THE 5 STRAND BRAID

I have always wanted to do a five strand braid.  This morning I intended to do it on my older daughter's hair but, as you will see in one of my next posts, I found myself trying a prom-like hairstyle on my oldest, so my "Little Peanut" became my FIVE STRAND BRAID model.  Here was my only problem - Peanut has the thinnest, wispy hair you can imagine AND apparently the jury is still out on a Sunday School hair cutting mystery that forced us to layer her hair!  So, at least I tried it and did enough were I could show you.  Since the hair began to fly out, I looped it under, tied a bow and called it a morning :-)


**Just comment if you have questions for me **


I have noticed that many people do these different ways.  The good news is that they all look the same in the end!  I only used half of her hair so I made a ponytail with the hair I wanted to use and then secured the rest of the hair to keep it out of the way.

Now this is a little cheat I use when doing any multiple strand braid (more than a three strand) I loosely put bands at the end of each section.  This keeps the strands separate and they are loose enough for me to move them down as I go.  You will notice that in this one I decided to put a green band on strand ONE.  I did this to make it easy for you to identify.
When you look at this picture the 6th band you
see is the secured hair, not a 6th section
So to begin the braid, you will take the 1st strand (green) and go OVER the 2nd strand.  
Then you go UNDER the 3rd strand
You obviously can see that I am wearing gloves in these pictures.  You have discovered personal information about "Mama" :-)  I happen to be allergic to some sort of ingredient in a lot of hair products.  Ironically, it wasn't until my daughter was in the hospital that a nurse (thank you Rosie!) helped me figure it out.  So, since giving up hair products wasn't an option, I throw on some non-powered gloves if I have to use serum, shine spray, etc.  So, no you don't have to copy this to make these styles LOL although that would be funny! 


Now with your left hand you will have to hold that side.  The next step is to take STRAND 5 (yes you have skipped 4) and go OVER the 4th strand.
You will continue to work with strand 5 and go under the next strand (which happens to be the green strand).  
You will then go back to the left side and continue to repeat this process.  
Let me put this into very simple terms.  
START on the LEFT and go OVER, UNDER
Then go to the RIGHT and go OVER, UNDER
Back to the LEFT - OVER, UNDER..... Repeat, Repeat Repeat.  


I was doing it loosely so so I could take pictures and I found that it was really easy to pull tight so I didn't have to redo anything.  
See the mystery Sunday School haircut hairs! 

GIVEAWAY WINNER... WAIT... WINNERS!

So..... I am so excited to announce we have TWO winners to our first giveaway!  Apparently there was a slight tech-y issue and we had a few submissions after I had already put the names in a drawing and selected a winner. 

Because of this and it was the tech issue was confirmed, I decided to select put the new names into the bowl and re-draw!  

CONGRATULATIONS TO...

KATINA WALIA and ERICA ANGELO 

Erica is currently choosing from the wide selection of Clare's In Stock Bows and Katina's daughter has selected the Oh-So-Cute LadyBug Bow from Custom Bows by Clare!  

I hope you become as addicted to Clare's bows as I am ladies!!

All of you can check out Clare's amazing bows by clicking HERE
Now Katina, I will get you to do the competition styles (and convince your coaches to approve them) Ha ha ha! 

Check out our winner's styles:
Erica had won for one submission, but had her name in the drawing twice for two submissions, one for each daughter.  So I figured I would feature both of her hairstyles.  
Erica prepped her princesses for a festival and had a challenge because her youngest is also the one with the shorter hair so that is a double whammy! 
Katina, a fellow "Gym Mom" prepped her daughter for school.  You can see that, like many busy moms, Katina had to shoot the picture with her phone before her daughter jumped out of the car for school :-) 


THANK YOU AGAIN LADIES FOR ALL YOUR SUPPORT!  
Now Stay Tuned for a Giveaway next month as it may involve a VERY FAMOUS GYMNAST and a certain 
BOOK that she just released!!

Monday, April 16, 2012

Stay tuned: WINNER WINNER CHICKEN DINNER

 GIVEAWAY WINNER 

OK GUYS STAY TUNED!  I will announce our 1st giveaway winner later today! Hummmm I already know, but I may have a surprise up my sleeve! 

2nd Try Worked Better- Then a Variation

Well I was feeling so good about being able to complete the last hairstyle (yes, my chest was puffed out a bit).  Hey, like I said, I am not a professional.  I am a regular mom so when these ideas and things I see on the Internet actually work I tend to get excited.  Also, I may have mentioned this before, but I like the puzzle aspect of hairstyles.  Meaning, I will look at other individual's "how to" blogs or websites, but never videos.  If I can't figure it out from pictures and notes then I will wing it.  It actually becomes somewhat of a game to see what I end up with.  
So back to my 2nd try on my last style... THANK GOODNESS it actually was not only easy but a clear success!  This time I was able to complete this style (including the parting of the hair) in less than 15 minutes!  Here is a picture of the finished product the second time around! Click here for for step-by-step style instructions (scroll down for the variation)


We tried a bow and decided it doesn't work for an 8 year
old, perhaps for a younger girl it would be adorable!


Trying a Variation  
Then for school this morning my daughter decided she wanted this AGAIN since I had previously done it on a Saturday and a Sunday so her friends didn't see it.  Ughhh  this time I was working with frizzy hair that had been braided all night long.  So I gave in but decided she was now being given what I lovingly call the "HALF MOON" variation of this style.  It does require some hair pins but I only used 3 - it could have been 2 if I hadn't had a huge bump in the hair. CLICK HERE FOR INSTRUCTIONS ON HAIRSTYLE
How does my dog always manage to get in pictures!
Camera Hog!
For the Half Moon variation start with the part slightly higher up on the same right side and take pretty much the same size chunks of hair in.  You can always take slightly larger chunks of hair towards the end if you see that you have too many.  However, by starting a bit higher up you shouldn't have that issue.  Follow all the same directions but the french braid will stop at a half circle.  Continue the braid up and over the head, lay it down flat and tuck it into the circle  (I have to pin it to make it lay flat - I pin it after I tuck it into the hair).  Funny now that I look at the picture I guess calling this a French Braid French Twist would work too! 


Saturday, April 14, 2012

NEW COMPETITION STYLE!!!


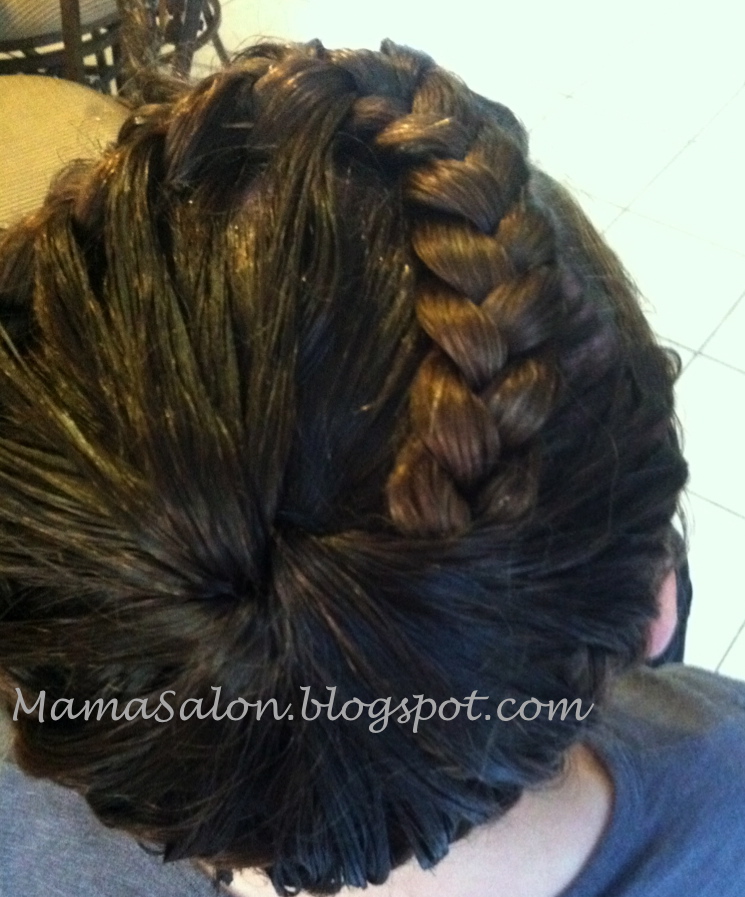
Well I saw this on Pinterest and just had to try this.  Much to my surprise it was much easier than I though AND.... it laid FLAT on my daughter's head which means it is PERFECT for my little flipping gymnast! Now this was my first attempt and I must admit, I didn't think it would be a success so I took pictures mainly at the beginning and the end.  However, once you get the beginning and the end then the middle is simply repetition.  


So here we go.... HAVE FUN! 
Start with a part on the right side.  you want to take a section of hair approximately 1 1/2 - 2 inches around your child's head.  


Although you want the amount of hair to be even all the way around, you don't need the circle of hair to be perfect as no one will see it.  Once you have parted the hair, pull the middle section into a tight, neat ponytail.  


You will then begin braiding.  I prefer to begin on the right hand side.  The reason for this is simply a matter of gravity - when you end the style you want the braid to be able to tuck in on the right with limited use of hairpins (if any at all).  
In order to start the braid you will take TWO small sections from the hair outside the ponytail and TWO  small sections from the hair in the ponytail.  Join ONE section from the ponytail and ONE from the outside together creating the middle section of a braid.  In other words, picture a traditional braid, the hair on the right will be made up of only hair from the outside section, the middle part will be a bit of both sections and the hair on the left will be only from the ponytail.  

Now you begin to french braid.  You will bring SMALL sections from the outer section on the right and SMALL sections from the ponytail on the left.  Be careful to keep the ponytail sections small as they need to last you all the way around the head.   

Continue the braid all the way around the head.  I highly recommend having your child on a higher stool and possibly sit on a chair while braiding the back or have your child put their chin to their chest to make it easier.  Don't worry if you see little hairs start to come out of the braid as these will not show at the end of the style.  
When you reach the top of your child's head you will not have hair to pull into the braid so continue braiding a traditional braid as far down as possible.  
Then, simply tuck the remaining section into the hair.  If your child's hair is shorter or if you are not using this for a sporting event, dance recital or gymnastics meet, then you can leave it without pins as gravity will hold it in place.   However, since my daughter was headed to practice I secured it with a total of 3 bobby pins.  


The picture I had originally seen of this style had clearly been done on shorter hair and the mom or stylist had a lot less to tuck in so when I finished and took these pictures I noticed the braid didn't lay flat due to Bella's long hair.  To fix this I simply laid the braid down flat, inserted a bobby pin along the braid and it stayed.  

Not only did the style stay, it stayed through 5 hours of being at the gym and it laid flatter than a bun so it didn't bother her during any of her skills!  I would call it SUCCESS... 


Thursday, April 12, 2012

A Great Bun Variation

Well if your coaches and teachers are anything like ours you are required to wear a bun for competitions, meets and/ or performances.  I can't stand the standard bun, but it's for more reasons than just the lack of creativity... it doesn't seem to hold and it doesn't take long before the hair, especially around the face, ends up falling out. So here is another variation of a bun.  


Once again I used my Reverse French Braid (aka Dutch Braid). I find that it not only holds the hair in tighter, but in darker hair it seems to show up better. 
Start with a side part and try to make it further to the side than you would normally do.  
Then section a line of hair from the side part to the ear (in my case it was the right ear).  Secure the rest of the hair with a band so it doesn't get in your way.  
I suggest you have your child tilt their head slightly towards you when beginning this braid to make it easier.  Then begin braiding - you want to keep the hair very close to the back line you made from the part to the ear.   Therefore, you will only be grabbing hair from the front of the head.  
When you get towards the corner of your child's head begin curving the braid and stand behind your child, the braid tends to follow where you stand :-) 
You will notice that I did not braid all the way down to the ear.  If you do this it will leave a weird bump when pulling it into the ponytail / bun.  Only curve it for about an inch to an inch and a half after you pass the ear and then proceed with a traditional braid.  

Ask your child to hold the braid forward while you gather the rest of the hair into a high ponytail.  Then grab the braid before securing the ponytail so it's included.  Now, you can leave this style as simply a ponytail and end here.  Or....... 
GYMNASTICS MEET NOTE:  I was doing this one for school so I didn't do the bun as high as I would have for a meet.  Also if it was for a gymnastics meet the braid section would have been smaller so I could pull the bun higher, but the instructions are otherwise the same.  


Take small sections of the ponytail and make small, traditional braids.  You can also make these into twisting braids - they take a bit longer, but look amazing in the bun! 
Then wrap them into a bun.  I have found that if I take 3 out of the 6 braids first and wrap them around in the circle, put a bobby pin in (just like one) then repeat with the additional 3 then it works better than trying to do them all at once.  Then I take a larger rubber band to tie around the bun to secure it.  You can secure any loose hairs with a bobby pin or two.  I don't like to use too many as they bug the kids.  
I put a bow in her hair for school, but of course she would have her matching scrunchie if she was at her meet.  
I managed to give Clare a sticker of my daughters to
add to one of her amazing bows

Apparently she still thinks she is at the meet


ONCE AGAIN A SPECIAL THANK YOU TO THE BEAUTIFUL BOWS MY DAUGHTERS ARE SPOILED WITH CLICK HERE TO CHECK OUT CUSTOM BOWS BY CLARE 

AND DON'T FORGET YOU CAN WIN ONE THIS WEEK IN OUR GIVEAWAY!!!