Tuesday, May 22, 2012

Princess Leia Has Nothing On Us!


Awww it is so good to be back!  Like most moms the month of May makes us feel like hamsters on spinning wheels - mine seemed to be spinning ultra fast this year.  So today I took a breath.  Thankfully my ability to braid wasn't affected, but my photography ability was... the pictures are awful, so hang in there with me :-)


As you can see I decided to modify a previous hairstyle!  One I have come to name the sunburst at our home.  Not sure why, but it seemed to catch on. Because this is a modification of a previous style and my pictures were awful today, you may see me use some of the past pictures to show you how.


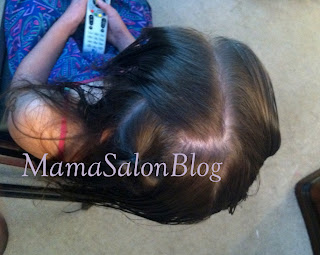
Start by parting the hair straight down the middle - as if you were making pigtails
I wish my part had been cleaner this morning but, believe it or not, this style was completed in less than 15 minutes (which may explain the awful pictures) so I decided perfection wasn't my goal.
Also, Boo's hair was half dry, half wet... I STRONGLY recommend that your child's hair be wet or dry, the in between stage is awful to braid as it sticks together a lot.


Then, secure one side of the hair so it stays out of your way
Now, stand to the side of your child (by their ear) and comb out the side you will be working with towards you.  Then, stand behind them (trust me on where to stand - it will save you many grunts) and take a 1/2" - 1" section of hair close to the part. Boo has a lot of hair so I went with the larger amount.
Then flip it to the side so it stays out of your way.  Continue to take about the same amount of hair so you end up with a center ponytail and loose hair all around.  As you can see in my picture, the circle of the ponytail does not have to be perfect.
Now, bring back the section you flipped over and you will want to part it where you will start braiding. I recommend standing at your child's side and parting it more towards the back right .  
Notice I flipped the front hair of the part forward so it stays
out of my way
Now you are actually done with the hard part!!!  It is time to braid.  I will reference an old picture to help you understand the beginning of the braid. Remember this?
In order to start the braid you will take TWO small sections from the hair outside the ponytail and TWO  small sections from the hair in the ponytail.  Join ONE section from the ponytail and ONE from the outside together creating the middle section of a braid.  In other words, picture a traditional braid, the hair on the right will be made up of only hair from the outside section, the middle part will be a bit of both sections and the hair on the left will be only from the ponytail. Then you begin a regular french braid.You will bring SMALL sections from the outer section on the right and SMALL sections from the ponytail on the left.  Be careful to keep the ponytail sections small as they need to last you all the way around the circle.   
Keep repeating this all the way around and when you come to the end finish with a traditional braid as far as you can go. Then tuck the braid into the circle.  Now, Boo has really long hair so I had to have a little cute loop on the outside, I wasn't sure about it at first, but I ended up liking it.  If your child has less hair, or shorter hair, you won't see this loop. 


They weren't totally even - my 1st attempt &
a total of 15 minutes... it was still super cute! 


Friday, May 4, 2012

Worms & A MOHAWK

It feels like I have been gone for so long!  Well like most moms the end of the school year means a very full calendar so, even though my hair styles continue at home (and yes, I do take pictures!) I haven't posted them all.  So, I have some catching up to do.  


Every once in a while a hairstyle you try comes out totally wrong and from that you develop a new, sometimes even greater style.  Or... what starts out as a joke turns out to be a pretty great style.  That seemed to be the case last Friday for me with my "Boo".  It was crazy hair day at her school and we decided to do a "Worm Mohawk".  Sounds crazy enough right?!?!  Well, how did we know that it would turn out pretty and her friends would end up asking me to do this "on a regular day".  Go figure!  


Please excuse some of the blurry pictures - since I didn't really see this as a hairstyle that would be used that often (or even posted on this blog) I wasn't taking very many so I couldn't be selective. 


Now, unlike the styles I usually like for school, this one requires quite a few hairpins and, although it isn't hard, it is very time consuming so if you plan on doing this style make sure you have a great TV show, allow yourself 20-30 minutes (30 if it is your first time) and be sure you look at my video on twist braids if you are not familiar with them already.  The video is on my two previous posts.  


Have the following handy and ready: 
* a fine toothed comb
* a spray bottle or detangle spray if your child's hair is dry 
       (helps pull the ponytails tight & twist braids smooth)  
* a good amount of small rubber bands that match your child's haircolor 
 (very light blonds should actually use white bands as they blend really well - 
    a trick I learned this weekend :-) 
*  Hairpins that match your child's hair
*  Hair Serum or Shine Spray and Sparkles (optional) I just listed this as I used it
Begin by making 4 ponytails in a line down the center of the head.  The size of the ponytails should depend on the amount of hair.  
Make sure they are in a straight line and make sure the first one is a tad further back on the head and the last one is a bit higher off the neck this will help the mohawk stay closer together. 
You can see if you look close that my top pony is
secured back & the last is secured as high up as I could
You will find that it is near impossible to have equal amounts of hair in each pony - don't worry about that.  What IS important is to make sure the hair going into the ponytail is tight and slicked back.  You can use a fine toothed comb for this and a spray bottle or detangle spray to pull the hair back (or both).
After you have secured the ponytails begin by taking small sections of hair and making a ton of twist braids.  The smaller the sections the more impressive it will look.  However, there has to be a balance because it the section is too small the hair will simply slip from your hands as you try to braid it :-(  When I do the twist braid on this style I begin by spraying the hair with detangler, then I comb it with a fine-toothed comb, coat it with a small amount of serum and then begin my braid.  By doing this the twist stays tight and shiny.  Seeing as it was supposed to be a WORM, I was aiming for small, tight and shiny worms :-) 
Continue making these braids throughout the hair.  Once again, thank you the 7:30 a.m. airing of Spongebob Squarepants for holding my daughters attention through this adventure LOL That cartoon is getting a lot of free advertising here!  HA HA HA  To be honest, "Mama" loves it too so it keeps me a happy stylist! 

Once your braids are complete it is time to twist them and pin.  There was no rhyme or reason to my twist or pinning.  
I would loop it around the pony above it and then pin it and then the next one I would simply make a circle without looping it and pin it.  The only "rule" is to keep it close to the middle to keep the "MOHAWK" look.  So PIN PIN PIN away and before you know it.... TA DA! 
Simply pin any "fly-aways"


Sparkle if you wish, hairspray the heck out of it, and take a picture as you come to terms that you actually willingly gave your child a mohawk! 


Awwww it's good to be back!  :-)  HAPPY FRIDAY!   

That's Glitter in their hair but the camera makes it look like lint :-) 
PS - My daughter's gymnastics team competed this weekend and they all sported this style.  Not only was I able to teach the assistant coach this style using only the blog, the two of us easily did the hair on each gymnast (they have various textures of hair) and they looked AMAZING!  We received a ton of compliments and the girls loved a style that didn't interfere with their moves!!! 
Ballerinas I can only imagine what this would look like for your recitals! 
A Pre-Hairspray View from the top!